PayPal Standard
You can simplify accepting payments on your WordPress website with the PayPal Checkout Add-On.
RestroPress comes with PayPal Standard built-in and everything in this document deals with core features.
PayPal Standard is the basic PayPal account you can get in the basic RestroPress plugin. You can also link your existing PayPal account by filling up the required details.
Settings
You can find the option of PayPal Standard in the RestroPress>>settings>>payment gateways>>Paypal Standard.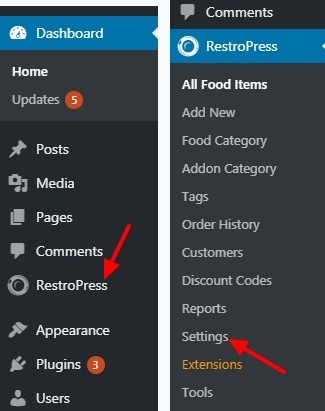
Here are the following fields that are required to be filled:
1. PayPal Email address
The first required field in the setting is the PayPal email address. You are required to mention the address that is associated with your PayPal account.
2. PayPal image URL
In this field, you must upload an image you want to display on the Checkout page.
The image must be publicly accessible on the internet and stored on a secure (HTTPS) server for it to show on the PayPal checkout.
Image Specifications:
- Size: Maximum 90 pixels wide by 60 pixels high
- Formats: valid Graphics format such as .gif, .jpg, or .png
3. PayPal Identity Token
The next field is about PayPal identity token, where you need to enter the token identity. This is required in order for payment records to be automatically marked as “Complete immediately” after purchase.
Follow the steps below that will help you to obtain the PayPal identity token:
Log in to your PayPal account. Hover over your profile name in the upper right corner of the screen and select Account Settings. Under the Products & Services heading, click on Website payments on the left side of the screen. Click the Update link next to Website Preferences.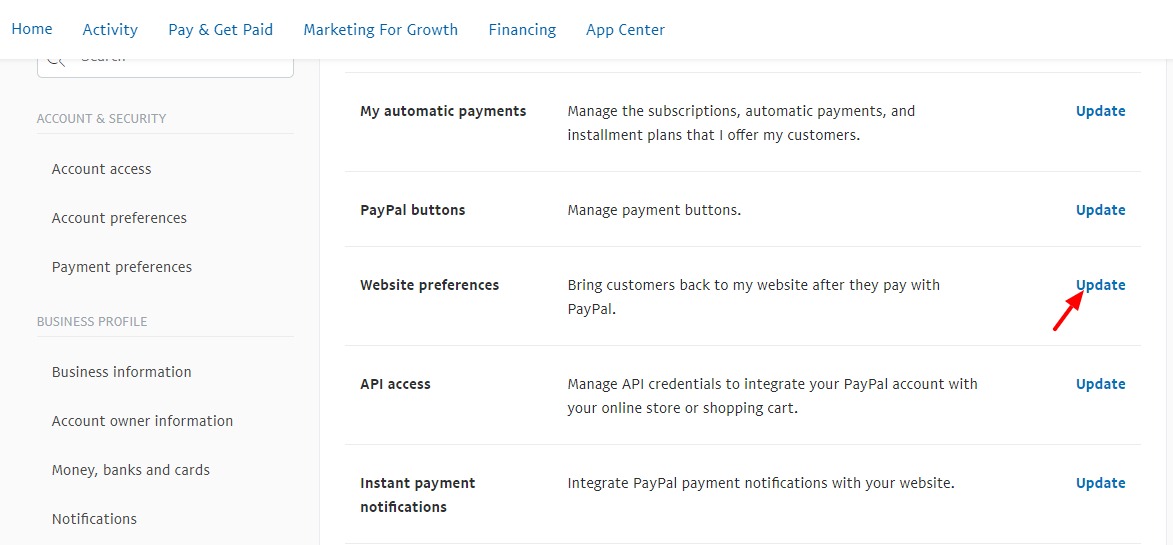
Set Auto Return to On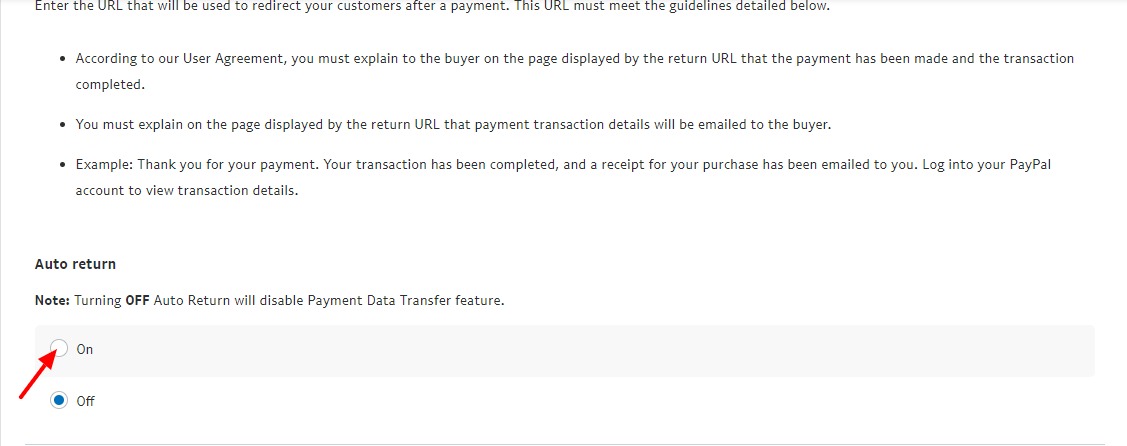
For the return URL, enter your website URL. In Payment Data Transfer, click the On option. Click Save.
Your PDT identity token should now be visible in the Payment Data Transfer section on the page.
Copy the token to your clipboard and paste it into the required field in RestroPress>>Settings>>Payment gateways>>PayPal Standard.
IPN Settings
The IPN (Instant Payment Notification) allows PayPal to communicate with your store and mark transactions as complete, failed, refunded, etc. It will automatically be configured when using PayPal Standard. But you need to confirm whether it is enabled in your PayPal account or not.
How to set up IPN:
-> Log in to your PayPal account.
-> Click on your profile name that is on the top right corner and you will get a dropdown. Select Account settings. On the account settings page, scroll down the page and look for Products and Services, under that select the Website Payments option.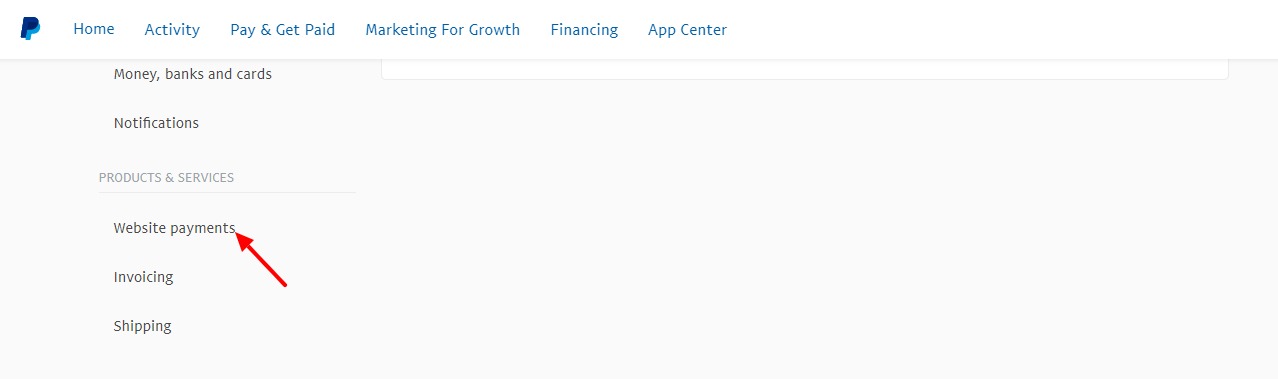
-> Find the option of Instant Payment Notification. Click on the update link to integrate PayPal payment notification with your website.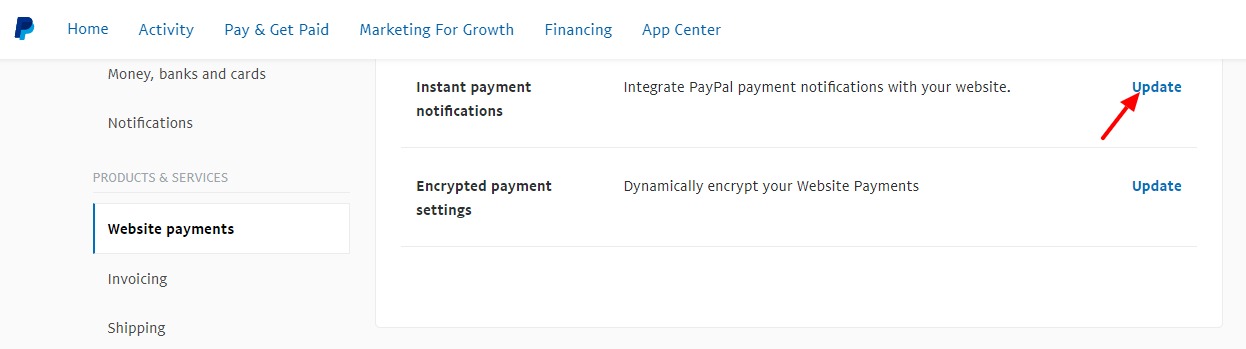
-> Select Choose IPN Settings button on that page.
-> PayPal sends IPN messages to the URL that you will mention in the Notification URL. To start receiving IPN messages, enter the notification URL, and select Receive IPN messages below. To temporarily stop receiving IPN messages, select Do not receive IPN messages below. PayPal continues to generate and store IPN messages until you select Receive IPN messages again or turn off IPN. Click on the Save button, to save your entered notification URL. (Note: Notification URL should be your domain name including http or https followed by ?rpress-listener=IPN e.g. https://domain.com/?rpress-listener=IPN)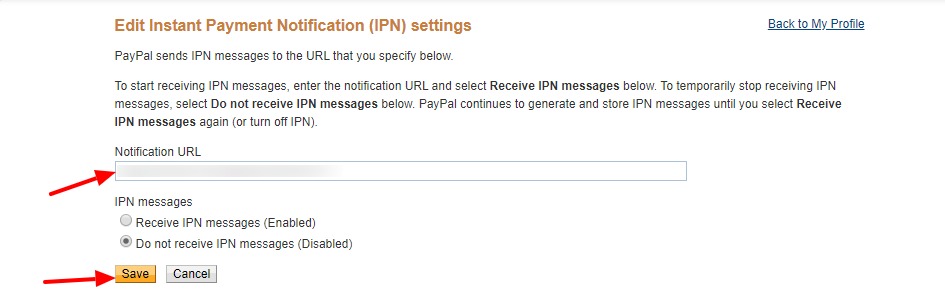
4. Disable PayPal IPN Verification
This option is only required to be checked only if the PayPal IPN is not working. You can disable IPN verification, which simply disables an extra verification step that is performed when IPN messages are processed.
-> PayPal IPN verification requires an SSL certificate.
If you need to access your IPN history,
5. API Credentials
PayPal API Keys allow the communication between your store and PayPal to be more reliable and to be direct.
This section requires API Keys for both, Live and Test.
Creation of Live Keys:
You need to visit https://developer.paypal.com/docs/archive/nvp-soap-api/apiCredentials/#creating-an-api-signature . Click on the login to Dashboard button that is present on the right top menu.
Then, log in to your normal PayPal account. Once you have successfully logged in, visit paypal.com , select account settings option that is available under your name at the top right corner.
Moving to the account settings page, you need to click on the update option that is available beside API access.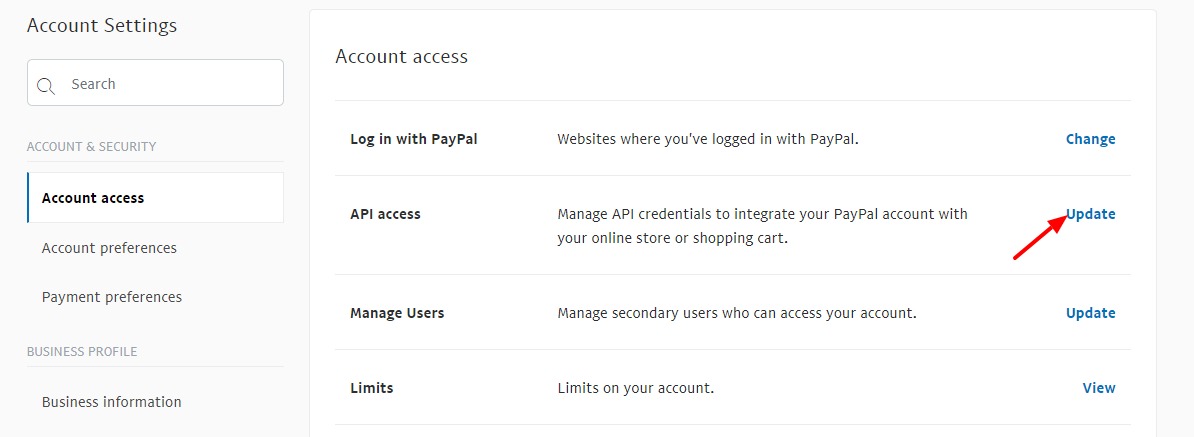
On the Next page, scroll down to the page and you will an option of Manage API credentials under the section NVP/SOAP API Integration.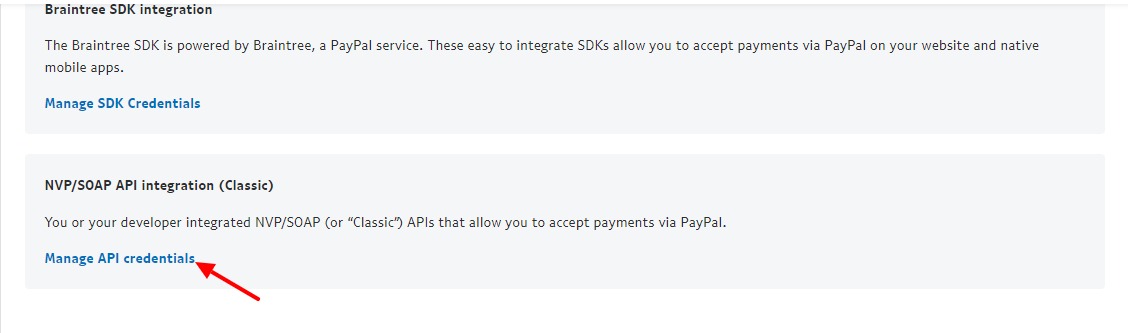
It will take you to the page where you can Request API Credentials, please select the option of Request API Signature and click on Agree and Submit button.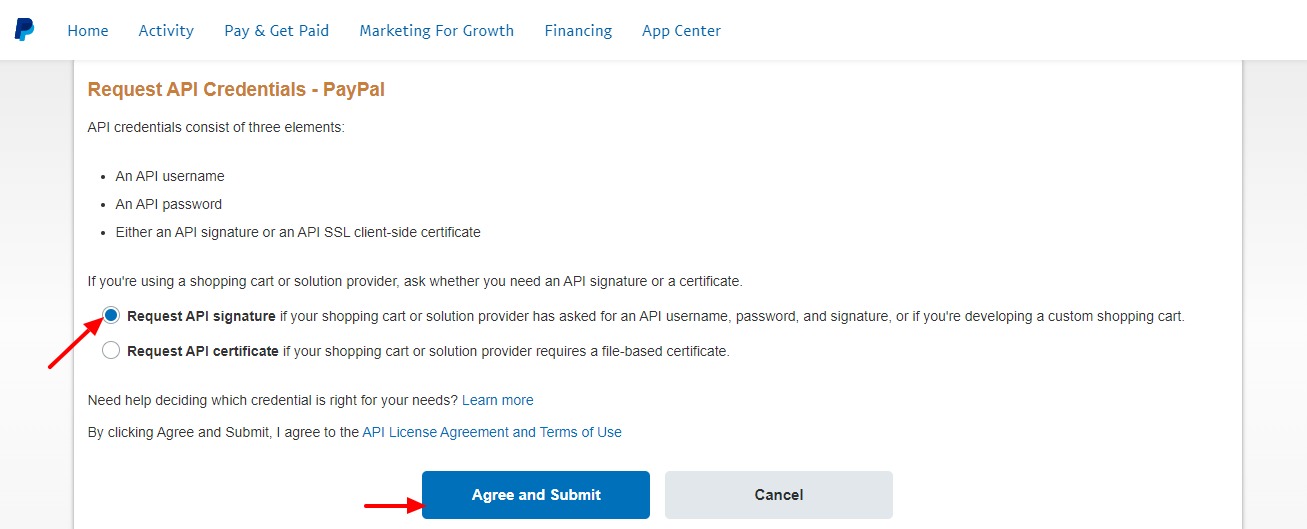
Moving on to the next page, you can find a box labeled Request API Signature. You need to check that radio button and then click on Agree and Submit. On the next page, you will have a list of:
- API Username
- API Password
- API Signature
A show link is attached to each option. The clicking show will reveal the details for each.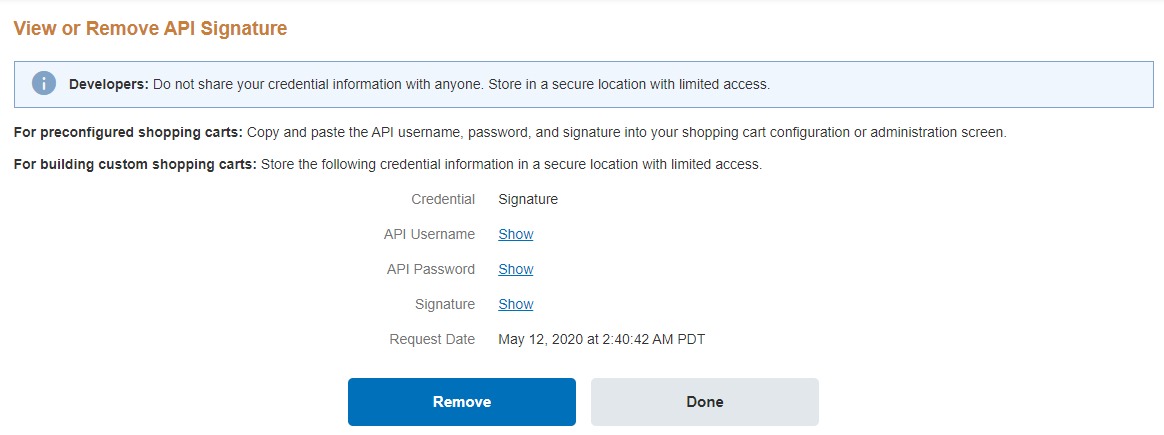
-> After the details are revealed, go to RestroPress>>settings>>Payment gateways>>PayPal Standard, and enter the details in the corresponding fields, in your admin dashboard.
6. Live API Username
Enter the API username that you have created in your PayPal account.
7. Live API Password
Enter the API password that was generated in your PayPal account.
8. Live API Signature
Enter the API string that was generated in your PayPal account.
-> After all the settings are successfully created and entered, click on the Save Changes button to save your settings.
Creation of Test Keys:
You can also enter the details of Test API in the corresponding fields that will be helpful in using the payment gateway for Testing purposes. You need to create a PayPal Sandbox account for that.
Creation of Sandbox Accounts:
Log in with your normal PayPal account. Once you are successfully logged in, Select Accounts option available under Sandbox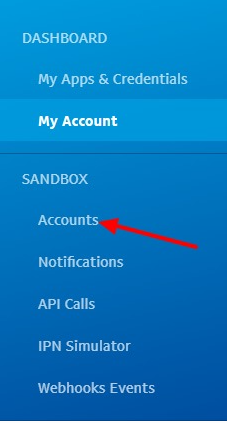
On the Next page, click on Create Account button 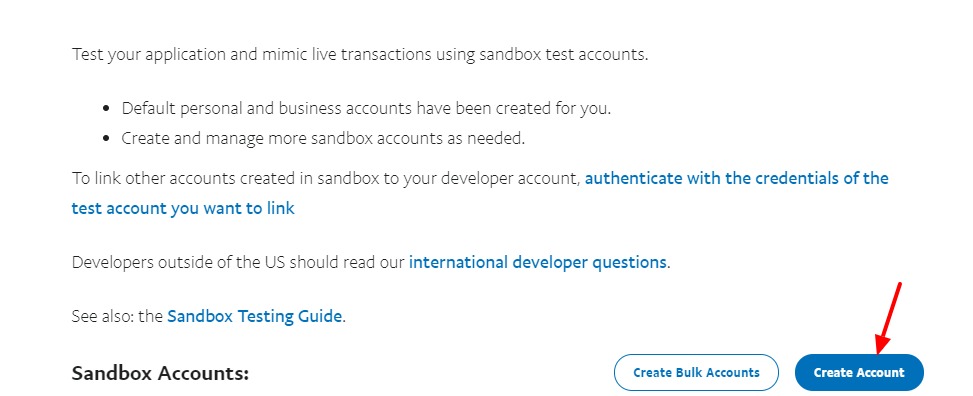
There will be a popup, where you need to select the Account Type, you want to create. Also, choose your Country. Click on the Create button.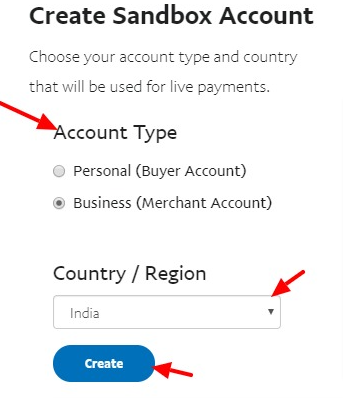
Once the account is created, it will show in the accounts list under Sandbox. PayPal generates an account for you with test values for your bank account, credit card, and balance. Click on the account created, and go to the Manage Account column of the Account lists table.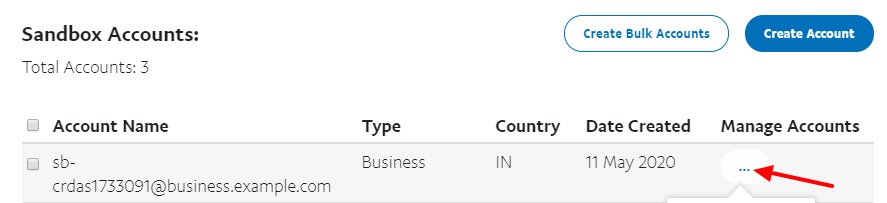
From there you need to copy the data and paste it in Restropress>>Settings>>Payment gateways>>PayPal Standard, in the corresponding fields, in your admin dashboard.
PayPal Sandbox allows you to set up Test accounts that will be helpful in testing the complete procedure of purchase including the payment in RestroPress. No amount is charged in that transaction.
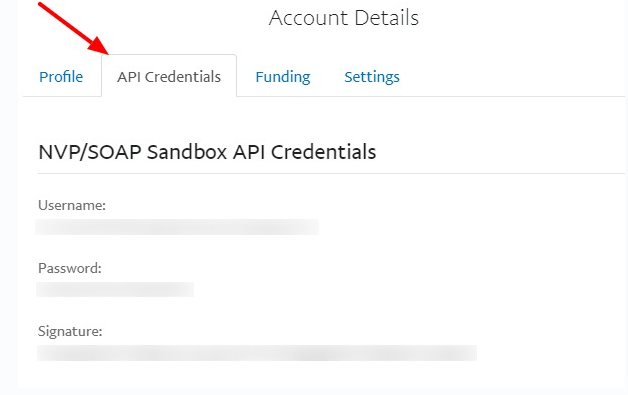
9. Test API Username
Enter the Username that is generated in your PayPal Sandbox account.
10. Test API Password
Enter the Password that is generated in your PayPal sandbox account.
11. Test API Signature
Enter the Signature that is generated in your PayPal Sandbox account.
-> After all the settings are successfully created and entered, click on the Save Changes button to save your settings.