Stripe Payment Gateway
This page of the documents contains the details regarding the addon of RestroPress. This is the payment gateway addon that is linked to Stripe. This page consists of the details about the Stripe payment gateway.
The Stripe payment gateway add-on allows your customer to enter their credit card details during the purchase on the checkout page directly. And they never leave the website that results in a better user experience and more successful conversions for you.
It is easy to create a Stripe account as they have a straightforward fee policy. They charge 2.9% + $0.30 for each successful transaction and there are no monthly charges.
Currently, Stripe is available in 32 countries.
Mode of payments:
Cards (Visa, Mastercard, American Express, Discover, Diners Club, JCB)
This add-on increases your conversion rate and lowers the bounce rate on the checkout/cart page. It supports both inline form and stripe checkout(popup). SSL Certificate should be installed on the site to use Stripe.
Installation
To install the Stripe payment gateway
- Download Stripe payment gateway
- Go to the site’s /wp-admin Plugins > Add New section.
- Go to the Install Plugins section and select the Upload option.
- Browse to and locate the ZIP file you downloaded in step 2, and select Install Now.
- Finally, go back to the Plugins page, find the Stripe payment gateway plugin and select Activate.
Setup
Go to Restropress -> Settings -> Payment Gateways -> General

Check the box of Stripe in Payment Gateway.
You can change the option in the Default Gateway option.
Payment Gateways there you will find the option of the stripe.
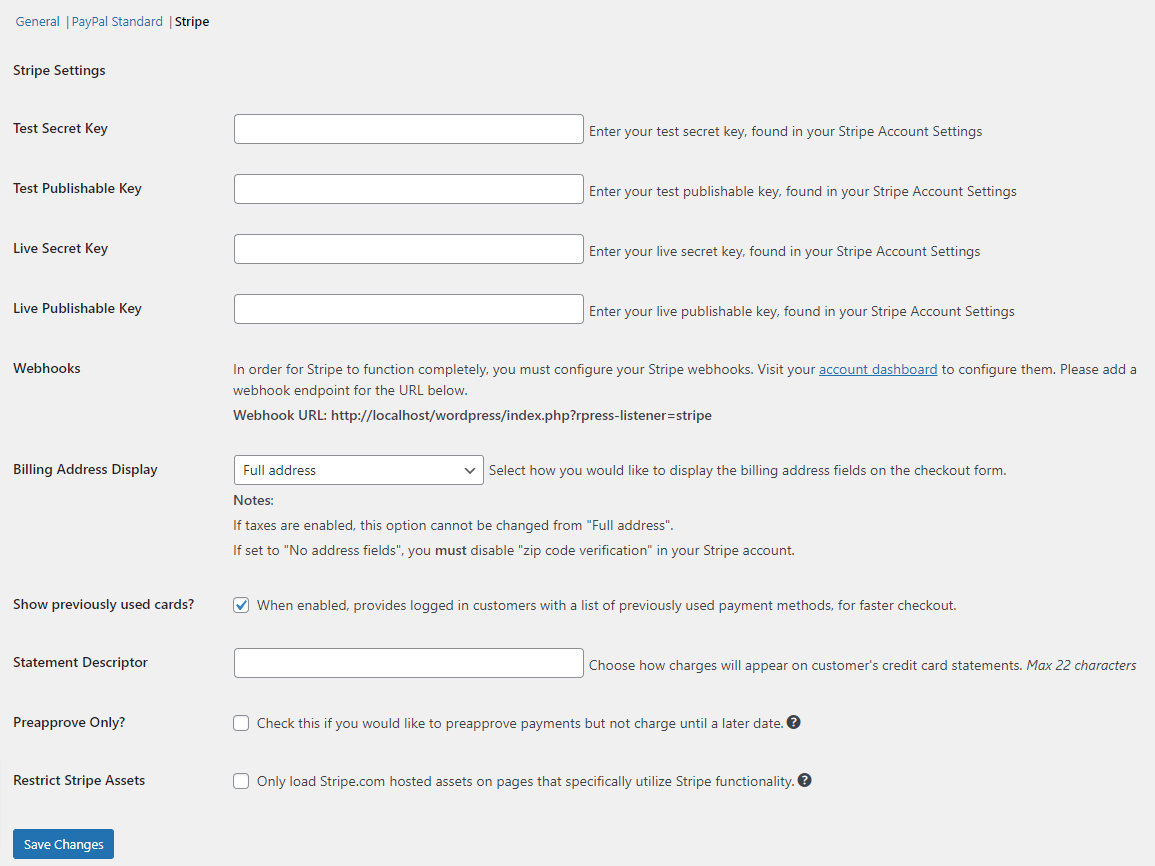
Stripe
Generate the Secret Key and Publishable Key for Test and Live.
After it is generated, enter the Keys in the stripe settings.
Billing Address Display
You can select the required fields that you would like to display in the billing address fields on the checkout form.
Note:
- If taxes are enabled, then the billing address option cannot be modified into any, other than Full address.
- If you select No Address Fields, you must also disable “Zip Code Verification” in your Stripe account.
If you check the box for Show previously used cards option, then it will show all the previously used cards to the logged-in user for faster checkout.
Statement Descriptor
You can choose how charges will appear on the customer’s credit card statements.
Preapprove Only
It is not compulsory to check this box unless you would like to pre-approve the payments but not charge until a later date.
Restrict Stripe Assets
It is not compulsory to check this box unless you want to only load stripe.com hosted assets on pages that specifically utilize Stripe functionality.
Save the changes, once you have made your required modifications.

