Settings & Options
Settings are the option that is mandatory to set after the plugin is successfully activated.
Then you have to go through all the settings available in RestroPress and you’ll find information about configuring those settings such as general settings, payment gateways, Emails, Tax, store timing, Accounts, API, and SMS notifications, etc.
This document explains each setting option of the plugin in detail.
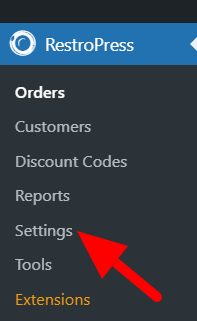
You can find the option of settings in the left side menu bar under RestroPress.
To get started, go to RestroPress > Settings
General:-
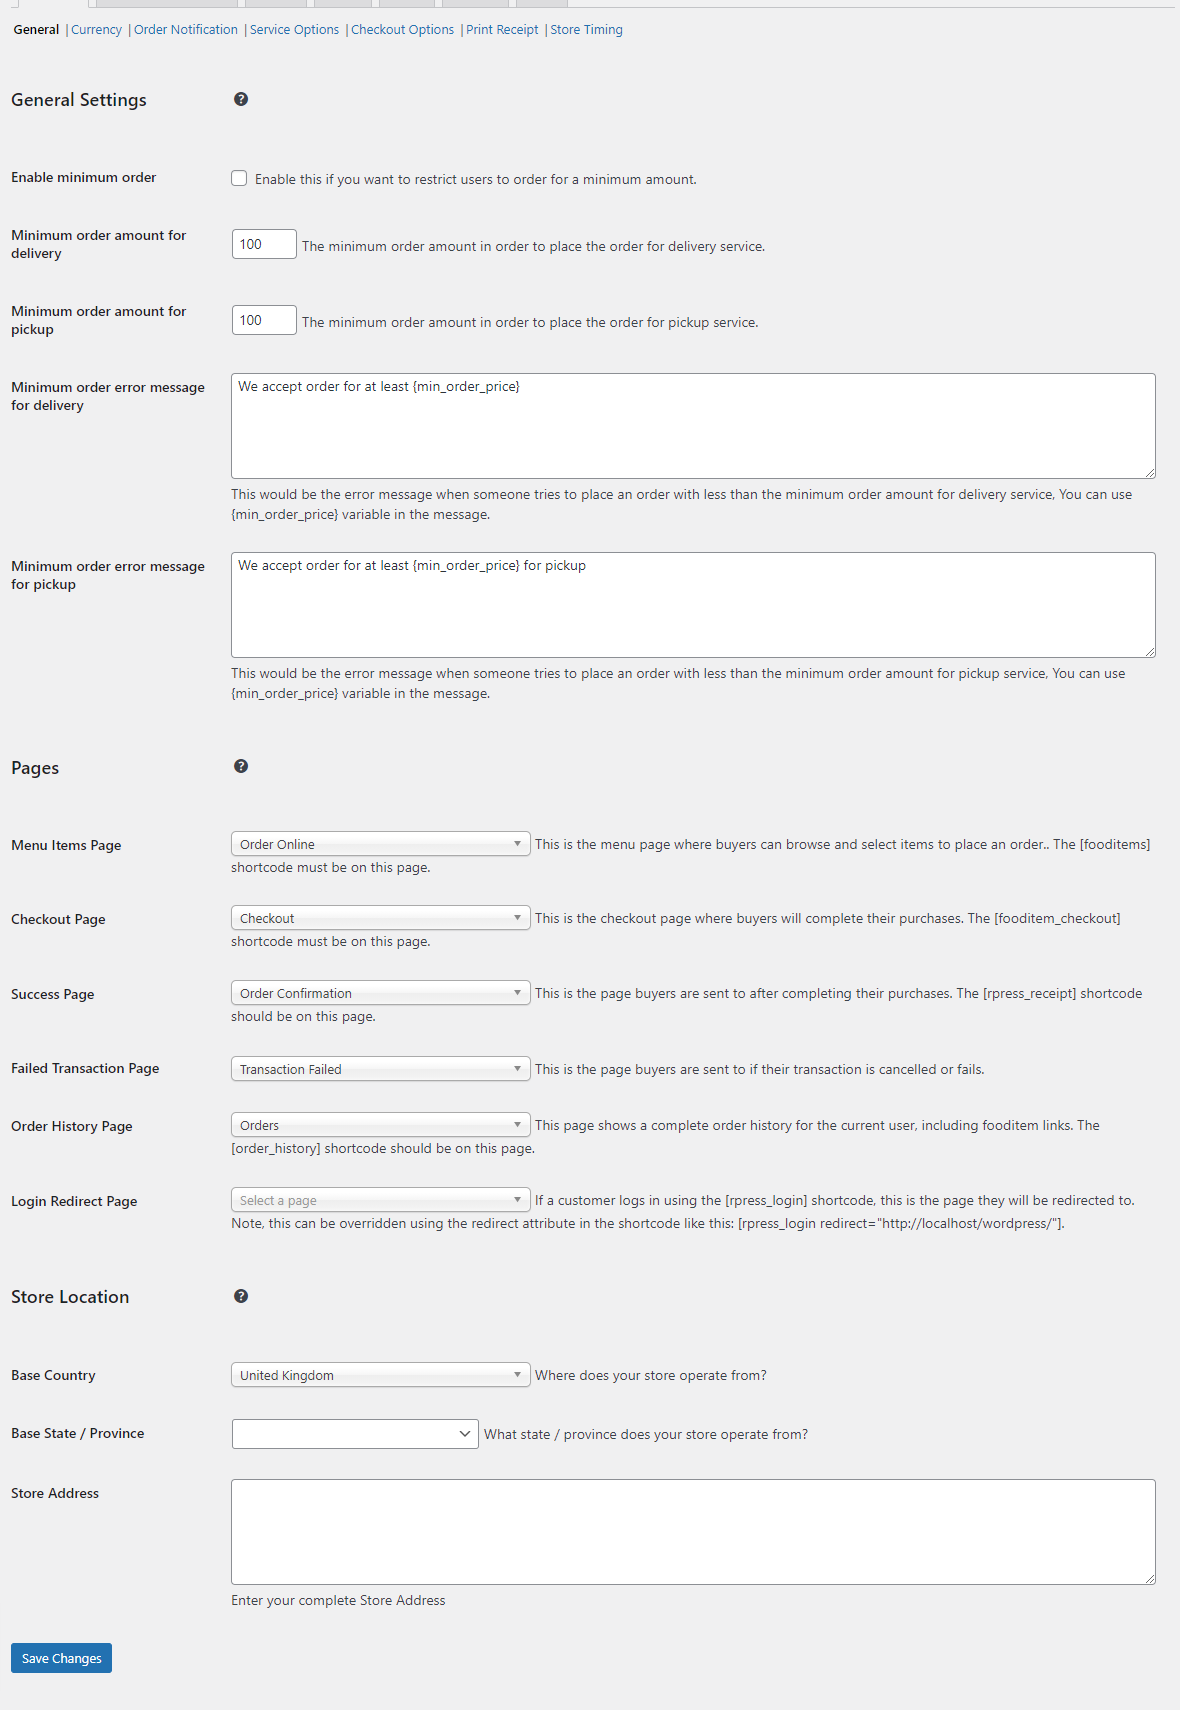
General Settings
Enable minimum order:
If you want your user to restrict purchasing a total minimum amount of food, you can enable the ‘Minimum Order Price’ option.
This option will restrict your users to purchase below the minimum amount set.
Minimum order amount for delivery:
You can set a minimum order price for Delivery by placing the amount you want to add. The purchase will be restricted to the minimum amount set.
Minimum order amount for pickup:
You can set a minimum order price for Pickup by placing the amount you want to add. The purchase will be restricted to the minimum amount set.
Minimum order error message for delivery:
Set a message to be displayed if a customer places orders less than the minimum order amount.
Minimum order error message for pickup:
Set a message that is to be shown if a customer places orders less than the minimum order amount.
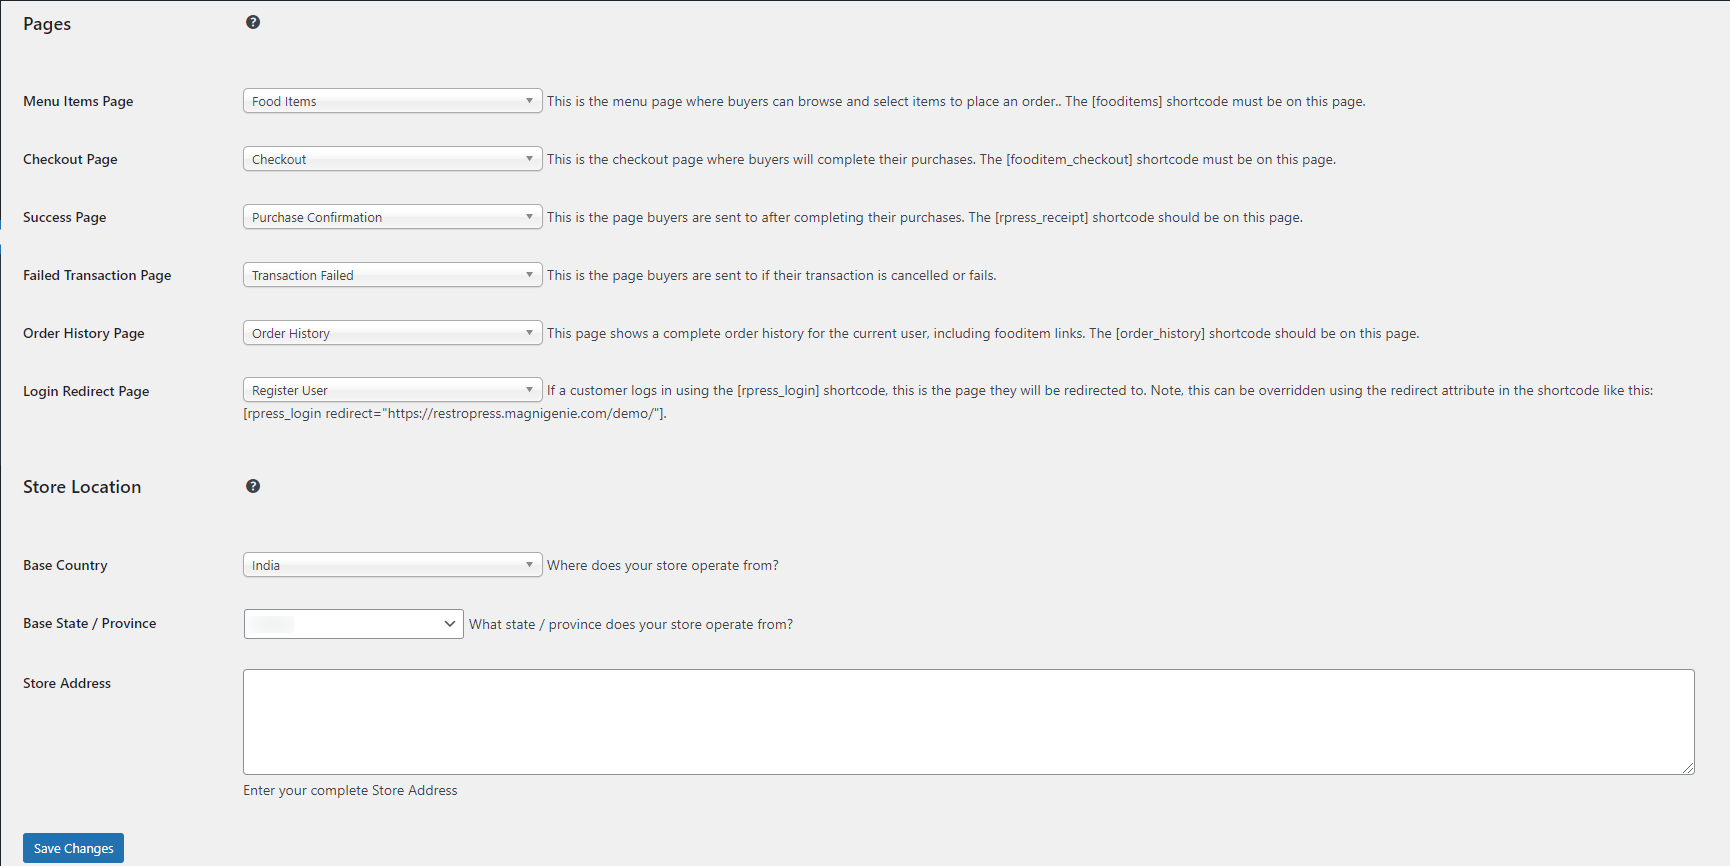
Pages:-
Menu Items Page:
This page needs to be linked to your Food Item menu. It is the page where your buyers will browse your food items.
[fooditems] shortcode must be used on this page.
Checkout page:
Assign the page that is designed for the checkout process. It will be concerned with completing purchase functionality.
[fooditem_checkout] shortcode must be used on this page.
Success page:
Assign the order confirmation page where you want to redirect after the order is confirmed.
[rpress_receipt] shortcode must be used on this page.
Failed Transaction page:
You need to assign the page where you want to redirect if the transaction is canceled or fails.
Order History Page:
Assign the page that consists of the complete order history for the current users including food item links.
[order_history] shortcode must be used on this page.
Login Redirect Page:
Assign the page where you want your customer to redirect just after the login. [order_history] shortcode must be used on this page.
Store location:-
Base country:
You need to enter the country name where your store is operating.
Base state/province:
You need to enter the state/province from where your store is operating.
Store Address:
Enter your Store’s complete Address. It will be displayed on the order confirmation page and also in the order receipt when you add the template tag to the receipt content.
 .
.
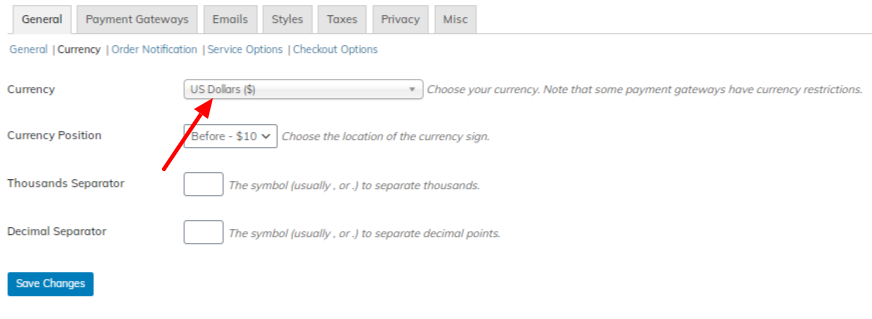
You can set your currency in the option available under this setting option.
Currency :
If you want to include your Currency, then you can use the following codes and place them in your “active theme’s functions.php file”:
//Add your custom currency
add_filter( 'rpress_currencies', 'rpress_add_currency' );
function rpress_add_currency( $currencies ) {
  //Replace with the currecy you want
  $currencies['Rp'] = __( 'Indonesian rupiah', 'restropress' );
  return $currencies;
}
If you want to Remove the Decimal from your Currency, you can use the following codes in your active theme’s functions.php file:
add_filter( 'rpress_currency_decimal_count', 'rpress_remove_decimal' );
function rpress_remove_decimal( $decimals ) {
 $decimals = 0;
 return $decimals;
}
You can enable notifications related to your order. Also, you can enter the title of the order along with its description. You can also upload your desired mp3 file for the notification sound.
You can choose the delivery or pickup service you want to add to your website.
Order Notification :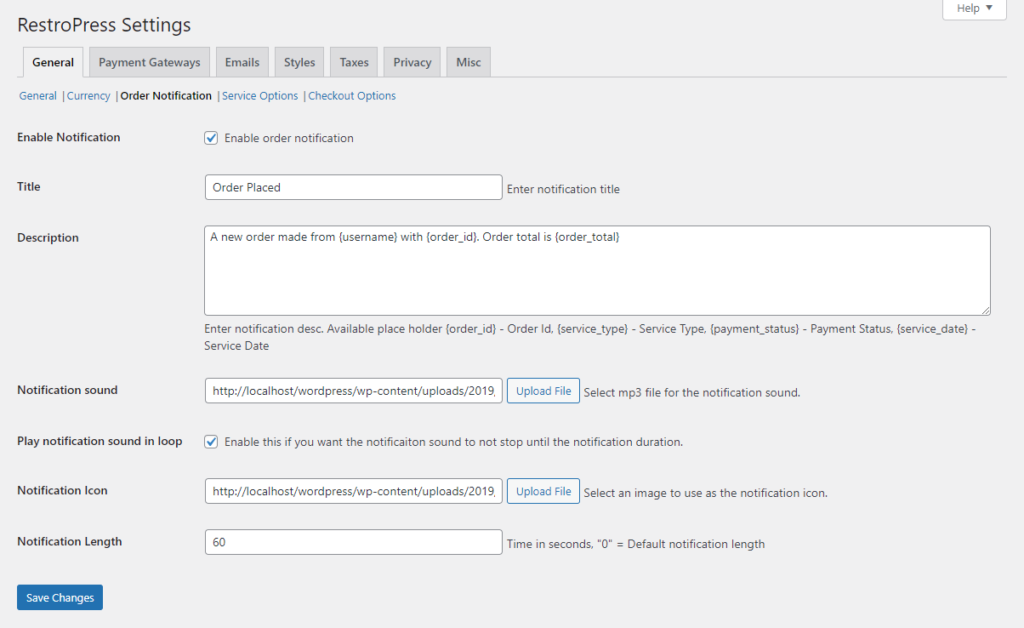
Service Option: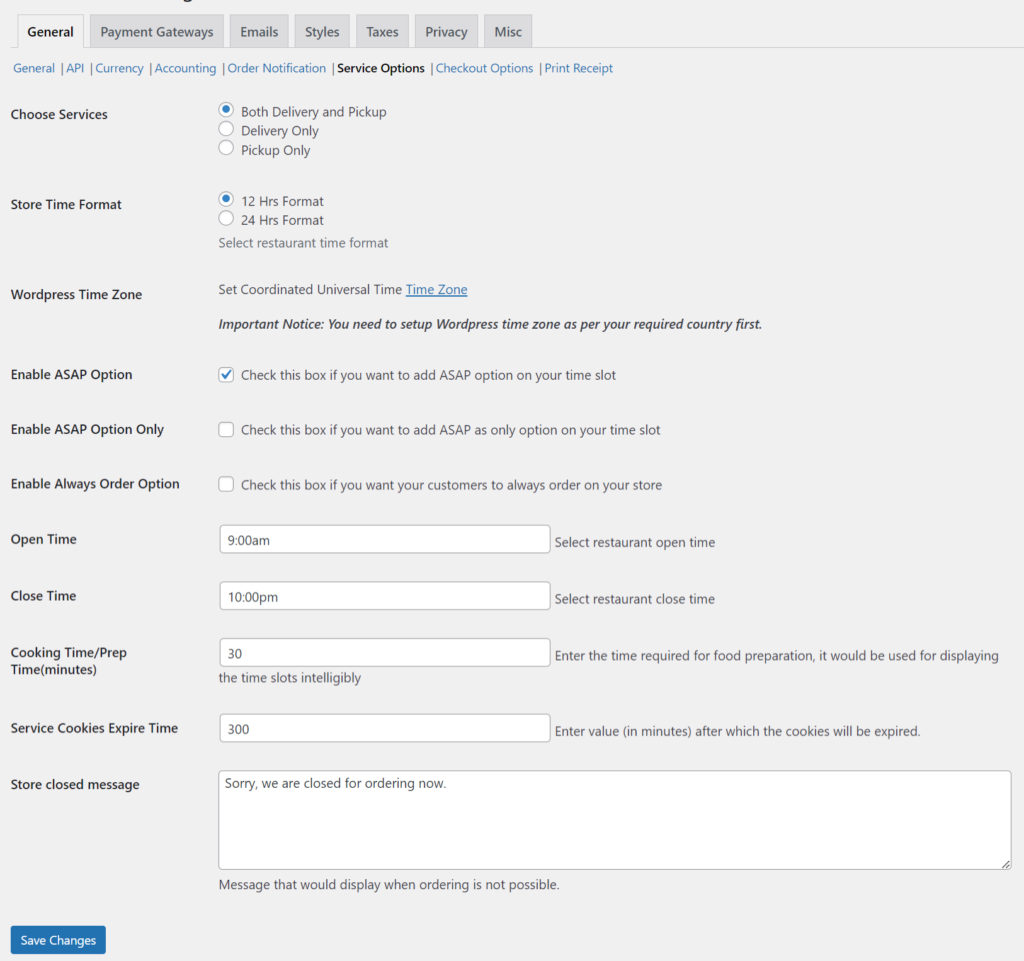
Choose Service :
Here you can able to set your required service type.
Set Time Format :
Select your time format.
Enable ASAP Option :
You can enable this option to show the ASAP option under the time slots list.
Enable ASAP Option Only :
Enable this option if you want to show only the ASAP instead of other time slots.
Enable Always Order Option :
This option will help you to enable your store for 24 hours.
Open Time:
Set your required store open time.
Close Time:
Set your store close time.
Cooking Time/ Prep Time:
Set up your required cooking preparation time so that the first slot will show that much forward.
Store Closed Message:
When your store is closed you can display a custom Store closed message.
Checkout options :
Enable some additional options related to checkout data on the checkout page.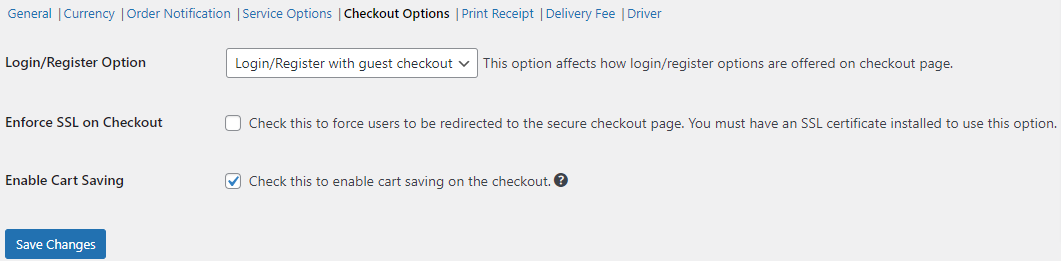
Payment Gateways :
This setting lets you enable the methods to select the payment method you want to have on your website’s checkout page. It consists of data related to the payment gateway.

General
You can add the type of payment method you want to enable.
You can also check whether your payment gateway is working or not by enabling the test payment option and then going for a test.
If Test mode is enabled then, you need to select test payment along with setting up the default gateway as test payment. Make sure to de-select test mode and related options once you make your payment gateway live.
Paypal Standard
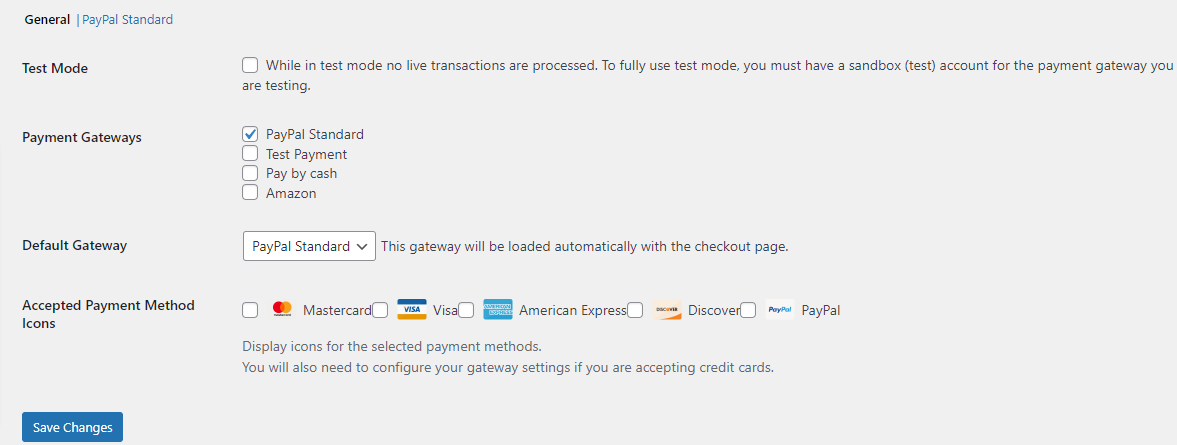
You can link your existing PayPal account by filling up the details.
You need to create an account in PayPal Standard payment gateway, where after creation you will get the required details for live and test credentials.
You can refer to this link that will redirect you to the guidelines page of PayPal Standard.
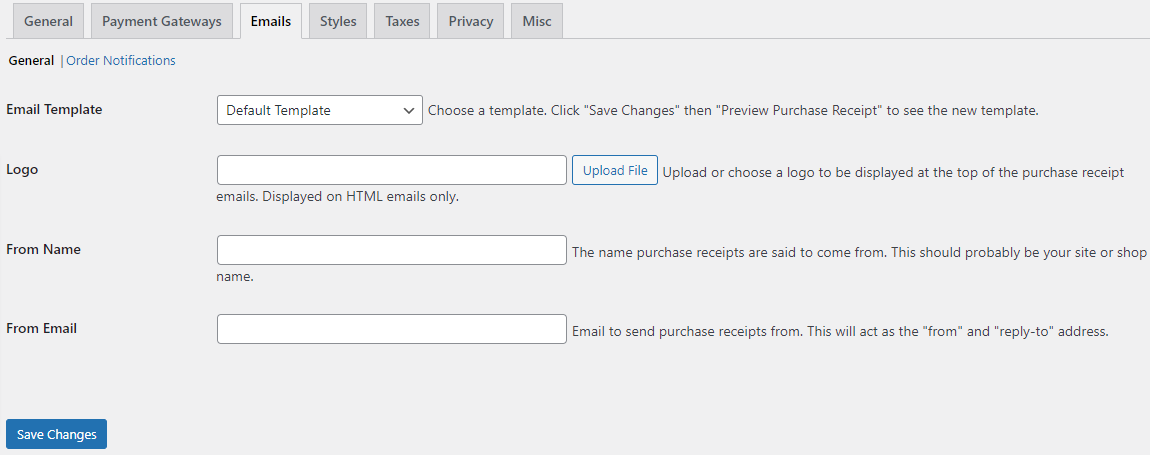
Emails :
This page is responsible for the purchase emails and the order status updates.
You can find the available template set up under the General setting of Emails.
General:
Order Notification :
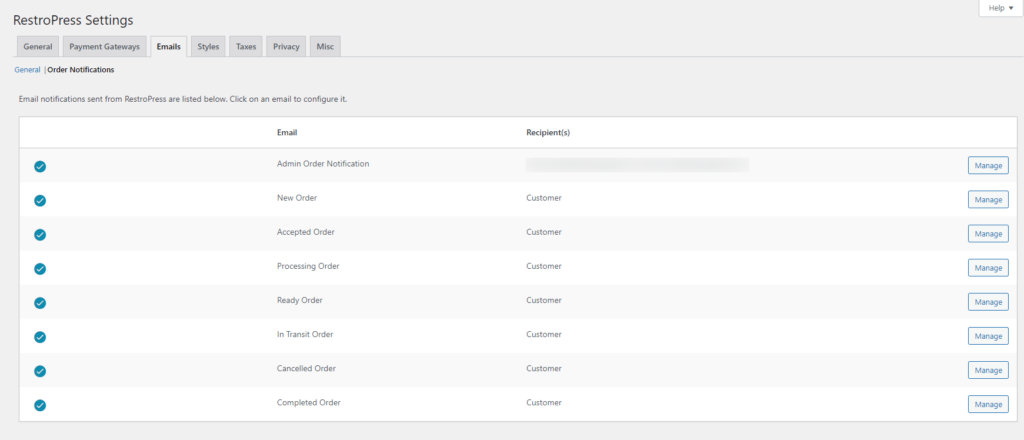
You need to set up the details under order notification that includes the email with its contents for each order status. Click on the Manage button to get the complete setup page for the emails and related. Use the template tags mentioned below the receipt content.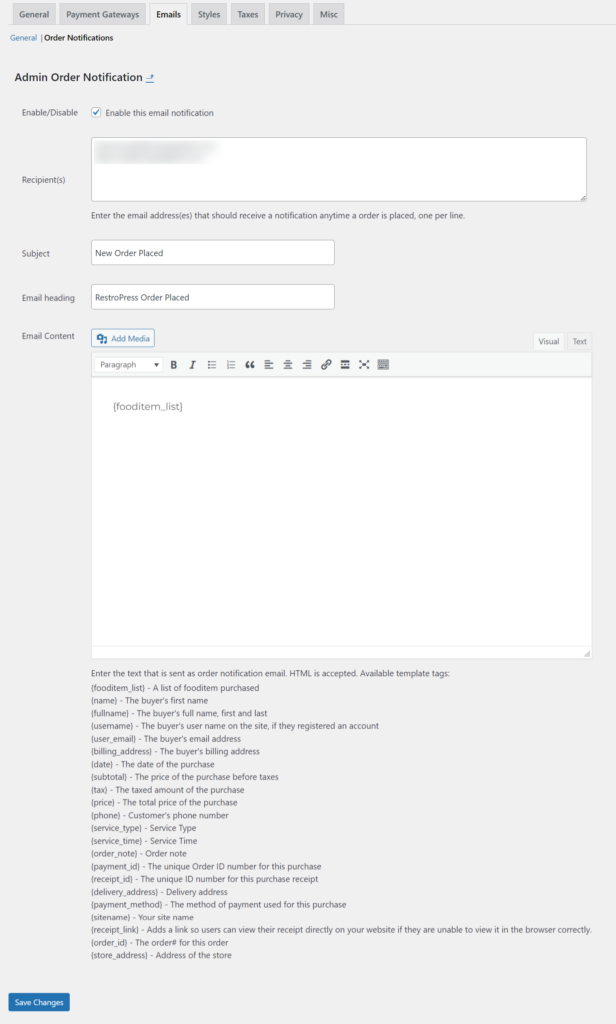
Admin Order Notification enables the emails for the admin side and rest other options are for the customer side for the new order notification.
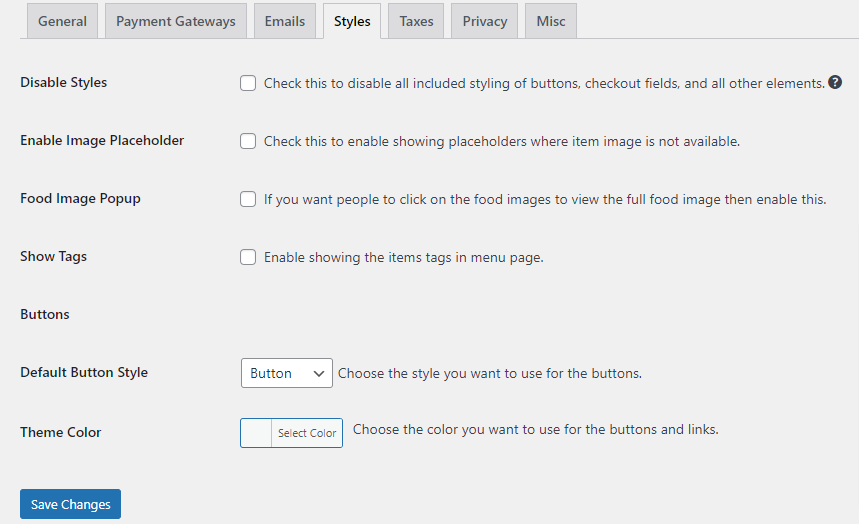
Styles :
It is responsible for the styling of the food items i.e.food images and also for styling of pages with buttons.
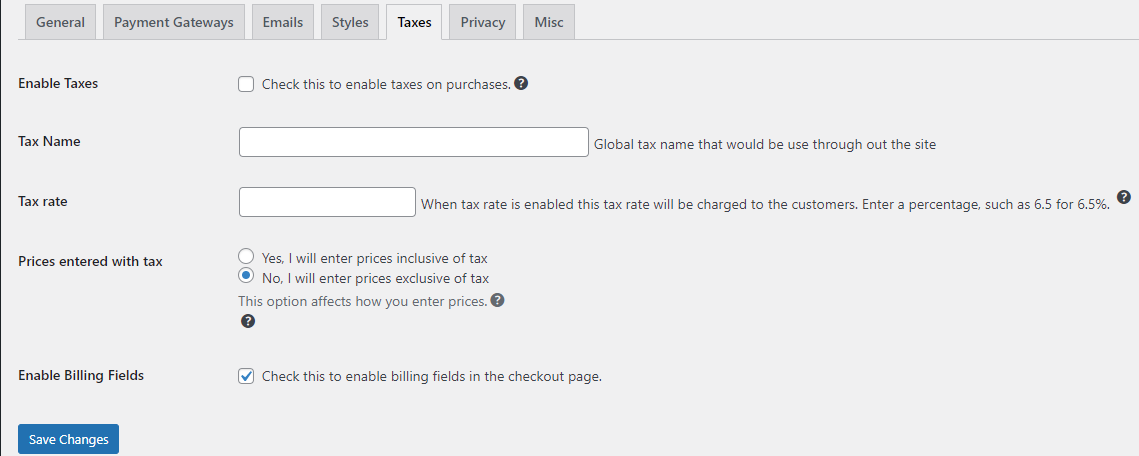
Taxes :
This page is concerned with the taxes that are to be charged to the customers. The options are explained. the meaning of their respective option.
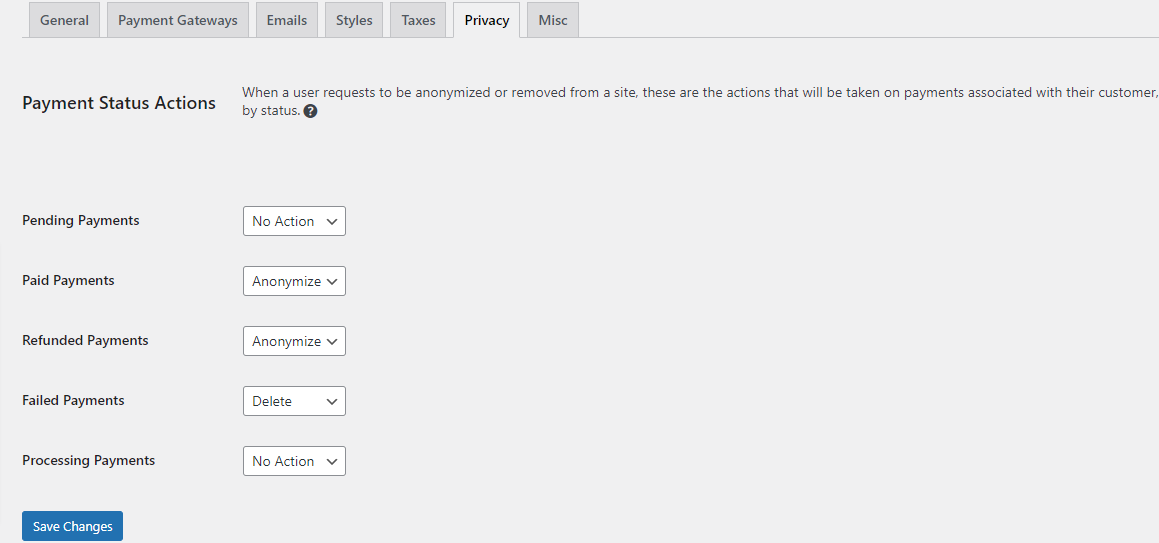
Privacy :
When a user is removed or anonymized from the website, his data and records are to be managed on this settings page.
Misc :
Miscellaneous
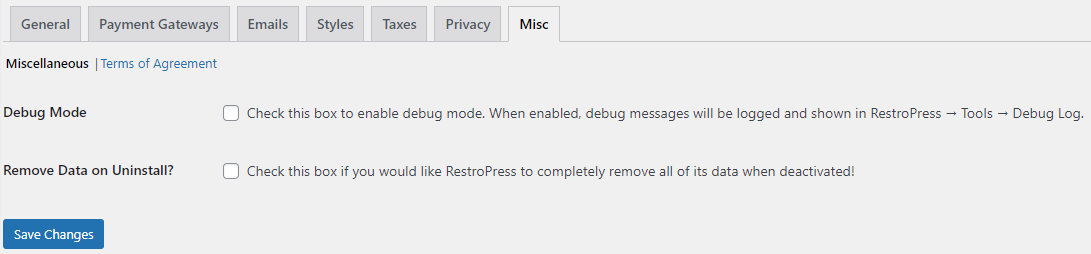
It includes the option to enable debug mode and removal of data after uninstallation.
Terms of Agreement
It includes the agreement terms that you want to be legitimate for the user of your website.
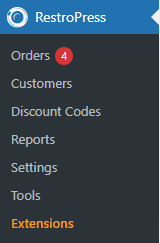
Other Options of Plugin :
 .
.
Orders: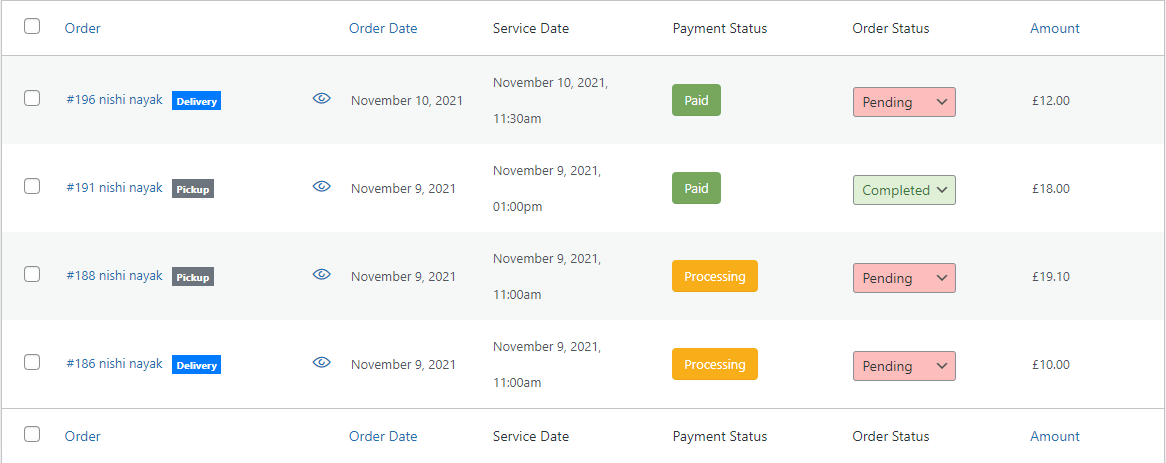
It will contain the records of the Orders that were being placed. You can check for the details of the orders on this page. It contains the complete details of the orders along with customer details.
Customers: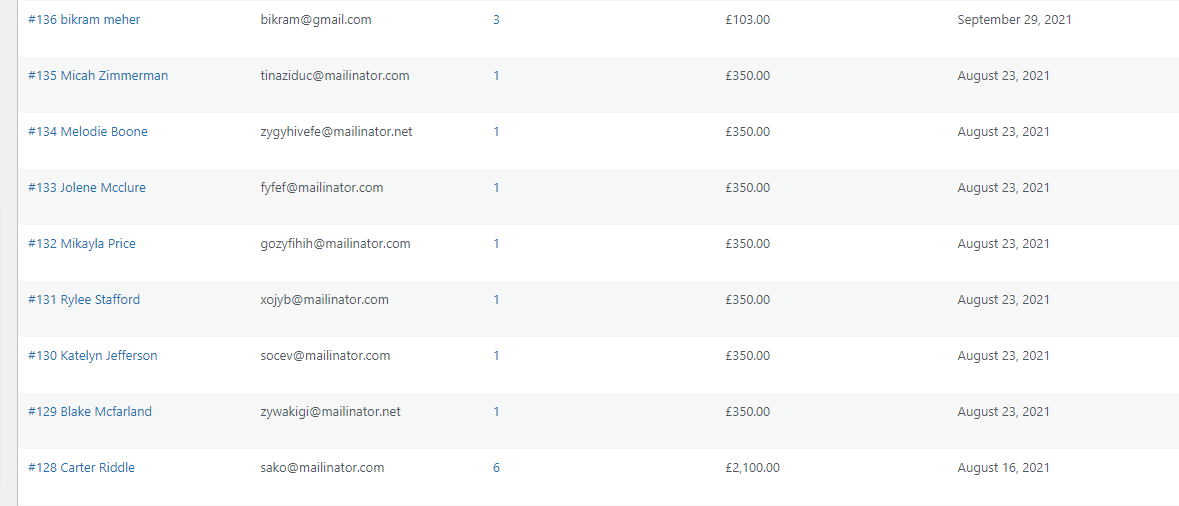
The records regarding the customers are stored here and also the details of the customers are stored in these options.
Discount Codes: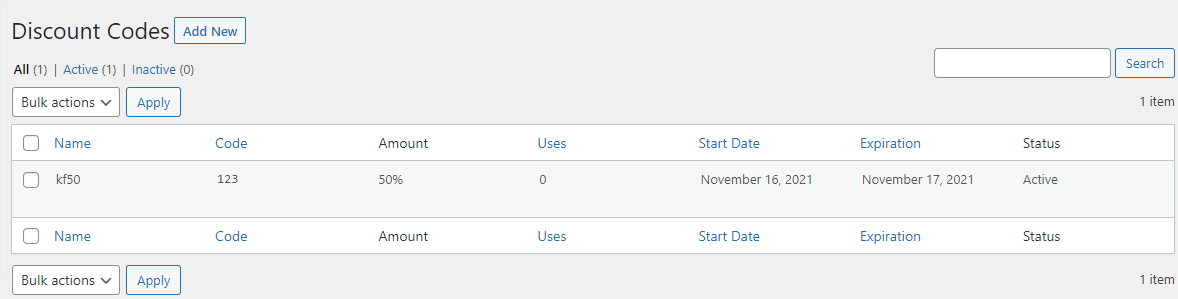
New discount codes can be created with required functionalities that include whether the discount will be applied to complete a purchase or some specific extension.
Reports: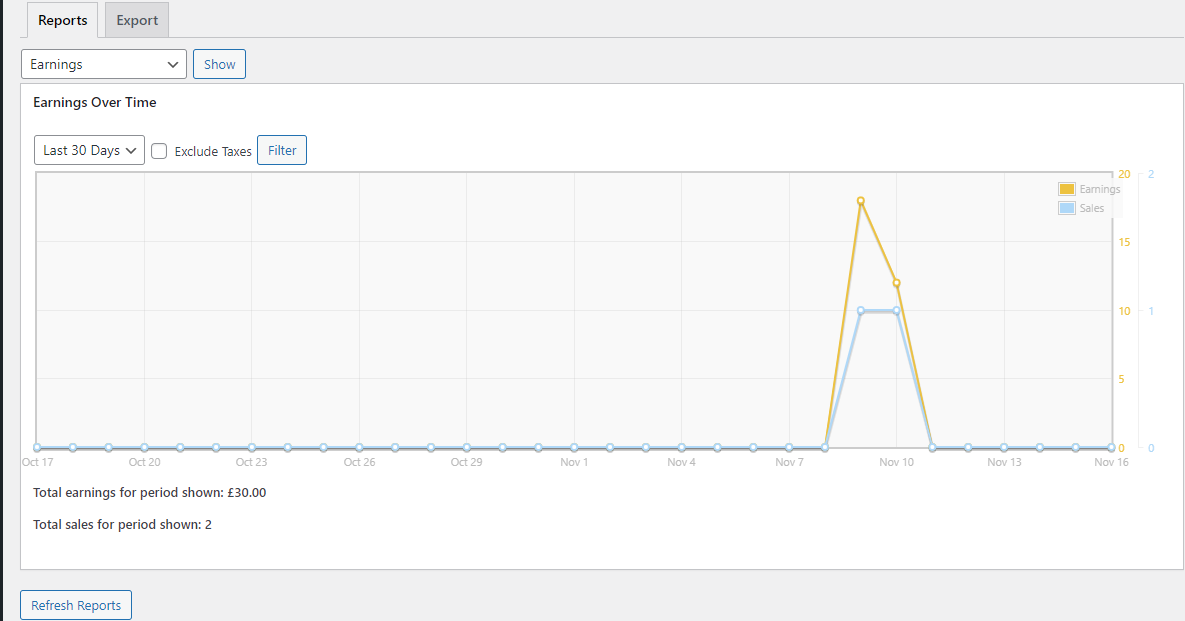
This option provides you with the total earnings and sales reports along with the export option for food items and customer data with order history.
Tools: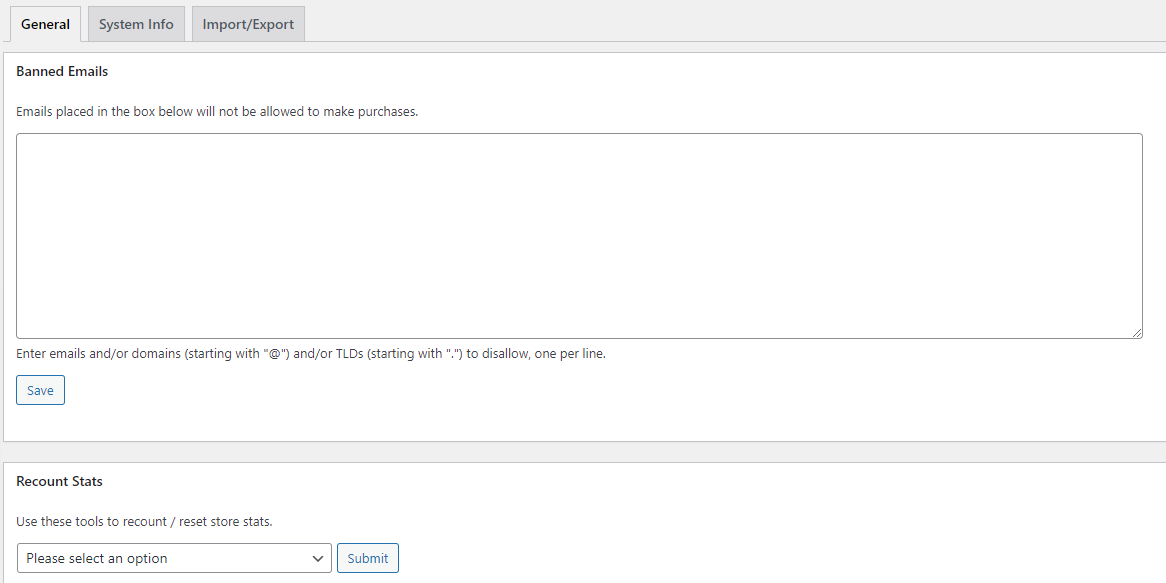
This option provides you with the option to reset and recount your website data.
Extensions:
You will find the fields to enter the License keys of all the extensions under this option.